Search This Blog

Saturday, December 14, 2013

Sam in Wonderland

Thus grew the tale of Wonderland
Thus slowly, one by one,
Its quaint events were hammered out-
And now the tale is done,
And home we steer a merry crew,
Beneath the setting sun."

 The "slowly, one by one" part sounds a lot like beading, no?

Stay with me.  I want to show you a necklace that involves beading, Alice in Wonderland, and a "sleeve."

A sleeve is an armful of tatoo.  The ENTIRE arm, usually from shoulder to wrist.  This must seem like random information but it is pertinent because I have a beautiful niece (Samantha, an animal welfare technician for a humane society) with an Alice in Wonderland sleeve. Here is how it looked after her first session with the needle.  Her bravery is vastly superior to my own!


Do you see Alice, the cards, the catepillar and his hookah, and the edge of the white rabbit?

About this time, when the sleeve was in this stage, I found a cabochon from Sandy Spivey with Alice imagery.  I thought it would be perfect for Samantha, and bought it.


Now unfortunately, this particular imagery is by a different artist than Sam's sleeve.  This is a Arthur Rackham illustration, in my opinion, among his best.  Her sleeve uses the illustrations of Sir John Tenniel.  Lots of different artists have taken on the illustration work, including Salvador Dali, but the Tenniel ones are more popular and familar to most people.  I worried that she might consider this a clash, (of style or maybe values) but finally this fall, decided that I would make it up for her and let her decide if it was wearable.

I wanted to honor the barely colorized, sepia look of the cab, so chose muted colors from the cab itself.


I used a delicate matte gold 24k delica in the bezel and some hints of pink and bronze, with a dab of Miyuki Baroque pearls in the surrounding embellishment and the stringing.  I really enjoyed working with the superduos at the edge, but every effort I made with them in the yoke was very rigid and unpleasantly inflexible, so I finally decided that a strung yoke was the best way to encorporate everything I wanted .


I have to admit, I have lost track of the number of piercings in Samantha's ears, but I felt that two earrings would fill at least some of them, if she wanted to wear them, and bravely wire-wrapped cherry quartz points to suit the purpose.

Now, the sleeve is, I believe, complete and really pretty awesome.  It has super vibrant color, which my work lacks.

I know my feeble effort is quiet by comparison, but Sam seems to be pleased with it, and I was happy to do it for her.

If I get really lucky, some day, perhaps Sam will model the necklace for me and send me a picture!

Tuesday, December 10, 2013

Meeting Challenges

I have been an Etsy Beadweaver for almost four years.  During those years I have learned a lot about beading, photography, competition, the nature of people, (especially in groups) and about myself.  Most of the work in my Etsy shop was created for monthly challenges sponsored by the team.  The challenges have stretched me, encouraged me to step away from my comfort zone, and use materials, colors, techniques, and inspiration I would not otherwise have used. I have tried to win, and I have tried NOT to win, but I believe that just participating as often as I am able is beneficial in many ways. Like any endeavor, you get out what you put in, no matter what your goal.

There is a challenge underway currently, and I thought I would not have time to participate.  But as I looked as my teammates answers to the challenge, I decided I wanted to play along, and I took one weekend and stepped "Out of This World" with my beads, to create a piece I call Klingon Courtship Necklace.

 
 I do not think this is a brilliant piece of design work.  It's good, although I think it lacks clarity and focus.  I like it, and have given it a couple test wearings, and people who see it, like it too, and comment on it. It is certainly possible to knock out a little piece like this in a day or two, in between the laundry and Christmas cards.  If it was the sort of thing I did all the time, I might even be able to produce a really good bit of design work in that time. I love to bead and to design with beads, but for me, beading is a hobby.  To do a good job with design, I have to do the two-steps-forward-one-step-back dance of exploration and discovery.  And that requires time to think, and experiment. Klingon Courtship has garnered a couple votes from my teammates, which I always take as high honor.  Whoever you are, thank you so much for your votes of confidence!


I made a simple pair of earrings to go with it, because I like to wear earrings with a necklace, and I didn't have a pair that looked right.  So they will be sold with the necklace... a little bonus!

There are some interesting and wonderful pieces in this challenge and you can see them all and vote for your particular favorite at our team blog.  Please do!  Sometimes the breadth of ideas our team has really delights me.  I usually like the work that best meets the specific requirements of the challenge. The work that makes me feel something, and illustrates the theme in beads.  You might like that too, or the prettiest work, or the one done in your favorite color.  It's all good.   :)

I also participated in the November challenge, and learned to make Russian leaves, which is essentially increasing and decreasing peyote stitch at the end of each row.  I can see wonderful potential for this technique and look forward to trying out some ideas I had while making enough leaves to cement the process in my head and hands.

I got to write this challenge, as reward for winning the September challenge.  The idea was to use a picture postcard as a color palette, trying to get the hue, value, intensity and proportion of the color in the postcard to appear in the beadwork, which could be anything except a copy of the card.  I did assignments similar to this in a weaving class, and was reminded of those assignments in gift shops on my vacation.  I thought it might make good challenge.

I think the color and proportion is reasonably accurate, although I found I did not want to put in the aqua blue of the little river.  I finally did it with dew-like drop beads, but there many not be enough of them to really represent that color proportionately well.


The shape is a little mundane, but again, I like it well enough, and in test-wearing it, I found it was liked by others as well.  I really enjoy people noticing my beadwoven jewelry, especially those who have not seen beadwork before.  Their reactions please me, and I hope they are inspired to give the technique a try themselves.

I have not been the best blogger this year.  I am finding that trying to maintain two websites, two blogs, and keep up with the constant ebb and flow of beadwork, my clients, and friends on facebook to be a time consuming adventure, on top of my business.  I enjoy it all, but it is hard to always be entirely up to date.  So this post catches up with my work in the last two Etsy Beadweaver's challenges.

Our team will have a new leader in 2014, and see some changes in the next year. I hope challenges will always be a part of the team activity.  Do you belong to a team, or teams?  Do you benefit from membership?  What makes you join a group?

Tuesday, December 3, 2013

Three Tools I Love

A reader, Jen, contacted me about some of the things is use in my work, and asked that I write about my tool kit.  It has taken me a while to assemble this post, but finally, here we go!

I think MOST of the tools I use and how I use them are common place, but I do a few things differently than most beaders.  So to begin I will talk about the use of thimbles.  I use one.  ALL the time.  Depending my my mood and the project, I choose between two different kinds.  One, I began using when I was tailoring at the Guthrie Theater.

Every professional tailor I know uses a thimble, and most professional stitchers do too, but I have never run across another beader who does.  I generally prefer my open-end tailors thimble above.  It's cooler, and usually my go-to choice in the summer.  Whether open or closed, every thimble has dimples, which allow you to connect with the eye of the needle in a slip-free way.

Fit matters.  Your thimble must be snug, but not tight, on your middle finger, and it should not contact your first finger joint when your finger flexes.  Blow into it before you put it on, and the moisture from your breath helps seal it to your finger. When I first tried to use a thimble, I had been sewing for at least 10 years.  It felt ridiculous, bulky and unpleasant, and I thought I would NEVER get used to it.  But after a few days of constant use, I found I could not do without it. It eases the stress through your entire working hand and arm, and I find even my shoulder tenses if I do not have a thimble and try to sew or bead.   I am also faster with it, because you can connect the two step, push and pull process that is sewing into one fluid motion.


Here is the beginning of a stitch, which could be through a bead just as easily as fabric.  You are holding your needle in your dominant hand, and your work in the other.  You aim the stitch you mean to take, and push the needle into the right spot.  If you are sewing without a thimble, you must do this by SQUEEZING your finger and thumb tightly on the needle, and then let go of the needle, move your fingers to the other side of the stitch, SQUEEZE it again and pull it through.  But if you are wearing a thimble, your fingers can relax on the needle and just steer, while your middle finger does all the pushing.  The side of your middle finger keeps the needle moving, while you re-position your fingers on the other side of the stitch.  I moved my thumb out of the way to show you how my middle finger is positioned in this picture.


The middle, thimble-armoured finger pushes the needle along its path, all the way to the eye, while your fingers reposition themselves to provide the final impetus that finishes each stitch.  So here is the end of the stroke, with my thumb and index finger pulled out of the way to show you the process.

But really, my fingers slide straight across the needle, to reposition and ease the needle through the final step of the stitch.

For me, this is just a faster, easier, and less stressful way to take a stitch.  My most critical tools are my thimbles.  I buy them at Wawak.com and this link will take you to the two pages of thimbles. Skip past the Clover and Dritz offernngs, to the "Wawak"ones. ( If my memory serves, the even numbered ones are English and the odd German, but this could be entirely wrong!)  I have very small fingers and wear a 4 or 5.  An average finger is probably an 8 or 9.  You may have to try several to get a good fit, or you may find that in the summer, you prefer a larger size and a smaller one in the winter.  It's worth fiddling around and getting good ones.  I have many, because I can lose a couple in a day as I work.  You will see Russian thimbles that have slots instead of dimples and they work OK, but, for me, the best control happens with the dimples.  Quilters leather thimbles?  Metal cut-aways? what ever works best for you.


This is my favorite thimble. I took it from my mom's sewing chest when I cleaned out her house, and it has a lovely feeling on my hand.  I have since done some research, and I think it was my Great Paternal Grandmother's engagement gift.  Before the DeBeers made diamonds the engagement gift requirement, thimbles were made by gold and silversmiths, and since household skills were valued, they were common engagement gifts.  I love how it fits, almost as though made for me, and I love the attached karma.

Jen asked specifically about two tools I use all the time, for thread control, and I'll talk about these tools next.  First Bead Stoppers.  This link goes to the Beadalon site, one provider of these little goodies, and they provide lists of retailers who sell their products.


I use these all the time in many ways.  Almost every time I begin a new component, I use this handy wire spring clip to determine how much tail I want to leave, and then to establish tension to make starting easier. I clamp the stopper an inch or two from my starting point, slip it to the back of my hand between my middle and ring fingers, and work against the tension provided by the stopper.  I leave the stopper in place while I work, moving it further from my work and allowing gravity to keep the tail away from my fingers and needle.


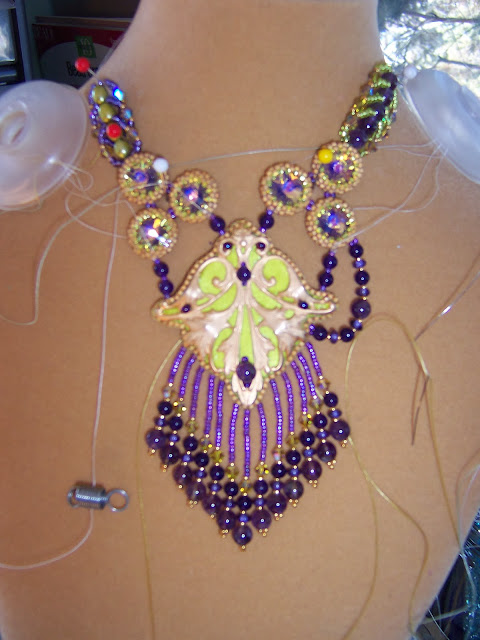
When I have multiple components and am working on layout, I can clamp threads for groups of components together to keep them out of my way and the handy loop on the stopper can be pinned to my form, like this:


In a couple places you can see I wrapped my many threads around the work, but this is a silly idea and invariably results in knots and tangles.  Don't do it.  :)

Once it is time to sew together multiple components, I use a different tool for thread control.  The stoppers are great in planning, and for individual components, but they do tend to catch my thread if I am joining many components at once.  So, time for the EZ Bob Bobbin!


I almost always use the longest thread I can manage when I bead, and leave a healthy tail when I begin.  I find that having thread available for connections and embellishment,without having to add improves the neatness of beadwork.  When I finish a component, I secure the thread so I COULD cut it off, but I never do until the very end of the project.  So I often have many working threads available.  I control all those threads while I bead with EZ Bobs.  They are made for use as kumihimo bobbins for beginners, and are available at most yarn shops.  I found listings on Amazon and eBay too, and I know many bead shops sell them as well.  The fact that when closed they are a smooth round dome with no corners or edges to catch my thread is great.  I can capture many threads together, usually using a bobbin for each side of the work, or if its really big, each section of work, and still be able to bead without getting caught on the multitude threads or the spring ends of the Bead Stoppers.  Sometimes I even combine both means of thread control!


Bead stoppers can also be used in stringing and testing fit.  I use a small stopper for each strand I am stringing, and a big stopper to tie the stoppered ends together to test fit. 

I could go on. I am a wordy girl!  But it was the thread control devices I was asked about and it was quite a while back.  And this post is plenty long without my taking on threads and conditioners, which would be my next thought.  So Jen, I hope this answers the questions you had, and if anyone is curious about anything else they see me doing, please just ask and I will try to respond in a more timely way!